
[React] OpenCV で画像を2値化してみる | 心を無にして始める React

Contents
準備
React で OpenCV.js を使えるようにしておきます。
![[React+OpenCV] JavaScript で 画像処理をはじめてみる@準備回 | 心を無にして始める](https://neko-note.org/wp-content/uploads/opencv-thumbnail-100x100.png)
2値化する
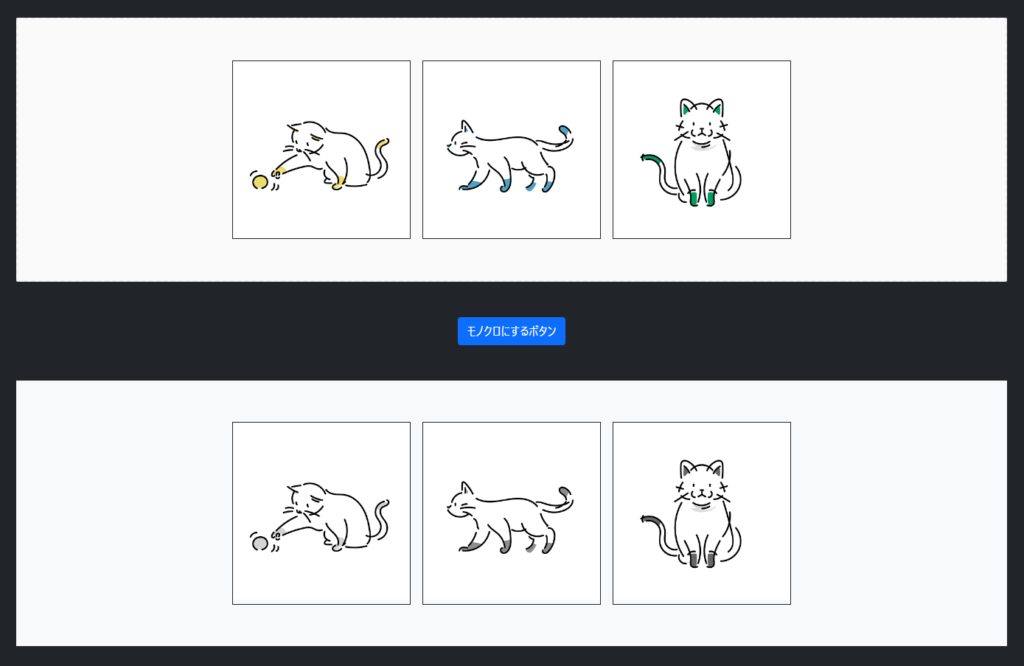
簡単なしきい値処理
使うものはこちら。
https://docs.opencv.org/5.x/d7/d1b/group__imgproc__misc.html#gae8a4a146d1ca78c626a53577199e9c57
簡単なしきい値処理では、しきい値を決めての2値化ができますが、画像処理では画像に合わせて 自動で しきい値を決めたいことが多いので、ここでは 大津の2値化 をします。
cv.threshold(grayMat, thresholdMat, 0, 255, cv.THRESH_OTSU);いつものように App.js を編集していきます。
(グレースケールにしてみる App.js をベースに少しだけ変更しています。)
import React, { useState } from 'react';
import './App.css';
import Button from './components/Button';
import Dropzone from "./components/DropZone";

const cv = window.cv;

function App() {
  const [urls, setUrls] = useState([]);

  const onDrop = (acceptedFiles) => {
    if (acceptedFiles) {
      setUrls(acceptedFiles.map(acceptedFile => URL.createObjectURL(acceptedFile)))
    }
  }

  const handleClick = (cb) => {
    if (urls.length <= 0) {
      cb();
      return;
    }

    urls.forEach((url, i) => {
      const img = new Image();
      img.src = url;
      img.onload = () => {
        img.height = 240;
        img.width = img.naturalWidth * (240 / img.naturalHeight);
        const imageMat = cv.imread(img);

        const grayMat = new cv.Mat();
        cv.cvtColor(imageMat, grayMat, cv.COLOR_RGBA2GRAY, 0);

        const thresholdMat = new cv.Mat();
        cv.threshold(grayMat, thresholdMat, 0, 255, cv.THRESH_OTSU);
        cv.imshow(`canvas-${i}`, thresholdMat);

        thresholdMat.delete();
        imageMat.delete();
        grayMat.delete();

        cb();
      }
    })
  }

  return (
    <>
      <div className="bg-dark p-5" style={{ minHeight: '100vh', height: '100%' }}>
        <Dropzone className="w-100" onDrop={onDrop}>
          <div className="d-flex justify-content-center align-items-center p-5">
            {
              urls.length === 0 && (
                <span>ファイルをドロップしてください</span>
              )
            }
            {
              urls.map(url => (
                <div key={url?.toString()} className="border border-dark m-2">
                  <img src={url} alt="" style={{ maxWidth: 320, maxHeight: 240 }} />
                </div>
              ))
            }
          </div>
        </Dropzone>
        <div className="d-flex justify-content-center align-items-center p-5">
          <Button valiant="info" onClick={handleClick}>大津の二値化をするボタン</Button>
        </div>
        {
          urls.length && (
            <div className="d-flex justify-content-center align-items-center p-5 bg-light">
              {
                urls.map((url, i) => (
                  <div className="border border-dark m-2">
                    <canvas className="bg-light" key={url?.toString()} id={`canvas-${i}`} />
                  </div>
                ))
              }
            </div>
          )
        }
      </div>
    </>
  );
}

export default App;
確認してみます。
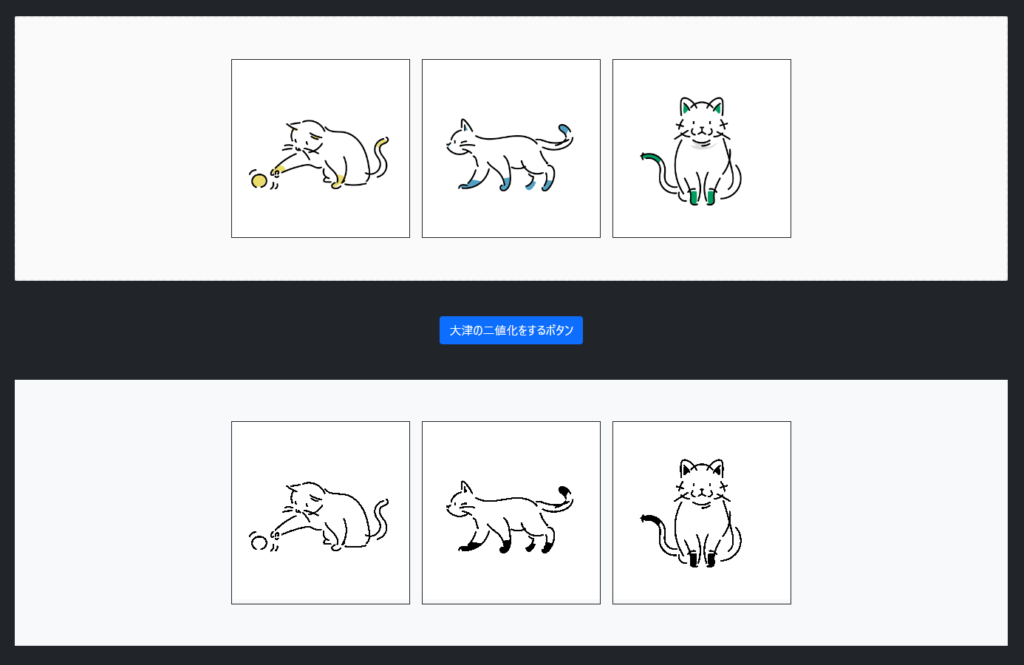
はい、できました。
適応的なしきい値処理
簡単なしきい値処理の threshold と比べて、適応的なしきい値処理ができる関数が用意されています。
https://docs.opencv.org/5.x/d7/d1b/group__imgproc__misc.html#ga72b913f352e4a1b1b397736707afcde3
今回は 近傍領域の中央値 をしきい値にしてみます。
画素ごとに、当該画素を中心とした1辺の長さが BlockSize の正方形の範囲の中央値がしきい値になります。
cv.adaptiveThreshold(grayMat, thresholdMat, 255, cv.ADAPTIVE_THRESH_MEAN_C, cv.THRESH_BINARY, 3, 1)App.js 全体ではこのようになります。
import React, { useState } from 'react';
import './App.css';
import Button from './components/Button';
import Dropzone from "./components/DropZone";

const cv = window.cv;

function App() {
  const [urls, setUrls] = useState([]);

  const onDrop = (acceptedFiles) => {
    if (acceptedFiles) {
      setUrls(acceptedFiles.map(acceptedFile => URL.createObjectURL(acceptedFile)))
    }
  }

  const handleClick = (cb) => {
    if (urls.length <= 0) {
      cb();
      return;
    }

    urls.forEach((url, i) => {
      const img = new Image();
      img.src = url;
      img.onload = () => {
        img.height = 240;
        img.width = img.naturalWidth * (240 / img.naturalHeight);
        const imageMat = cv.imread(img);

        const grayMat = new cv.Mat();
        cv.cvtColor(imageMat, grayMat, cv.COLOR_RGBA2GRAY, 0);

        const thresholdMat = new cv.Mat();
        cv.adaptiveThreshold(grayMat, thresholdMat, 255, cv.ADAPTIVE_THRESH_MEAN_C, cv.THRESH_BINARY, 3, 1)
        cv.imshow(`canvas-${i}`, thresholdMat);

        thresholdMat.delete();
        imageMat.delete();
        grayMat.delete();

        cb();
      }
    })
  }

  return (
    <>
      <div className="bg-dark p-5" style={{ minHeight: '100vh', height: '100%' }}>
        <Dropzone className="w-100" onDrop={onDrop}>
          <div className="d-flex justify-content-center align-items-center p-5">
            {
              urls.length === 0 && (
                <span>ファイルをドロップしてください</span>
              )
            }
            {
              urls.map(url => (
                <div key={url?.toString()} className="border border-dark m-2">
                  <img src={url} alt="" style={{ maxWidth: 320, maxHeight: 240 }} />
                </div>
              ))
            }
          </div>
        </Dropzone>
        <div className="d-flex justify-content-center align-items-center p-5">
          <Button valiant="info" onClick={handleClick}>適応的なしきい値で二値化をするボタン</Button>
        </div>
        {
          urls.length && (
            <div className="d-flex justify-content-center align-items-center p-5 bg-light">
              {
                urls.map((url, i) => (
                  <div className="border border-dark m-2">
                    <canvas className="bg-light" key={url?.toString()} id={`canvas-${i}`} />
                  </div>
                ))
              }
            </div>
          )
        }
      </div>
    </>
  );
}

export default App;
確認してみます。
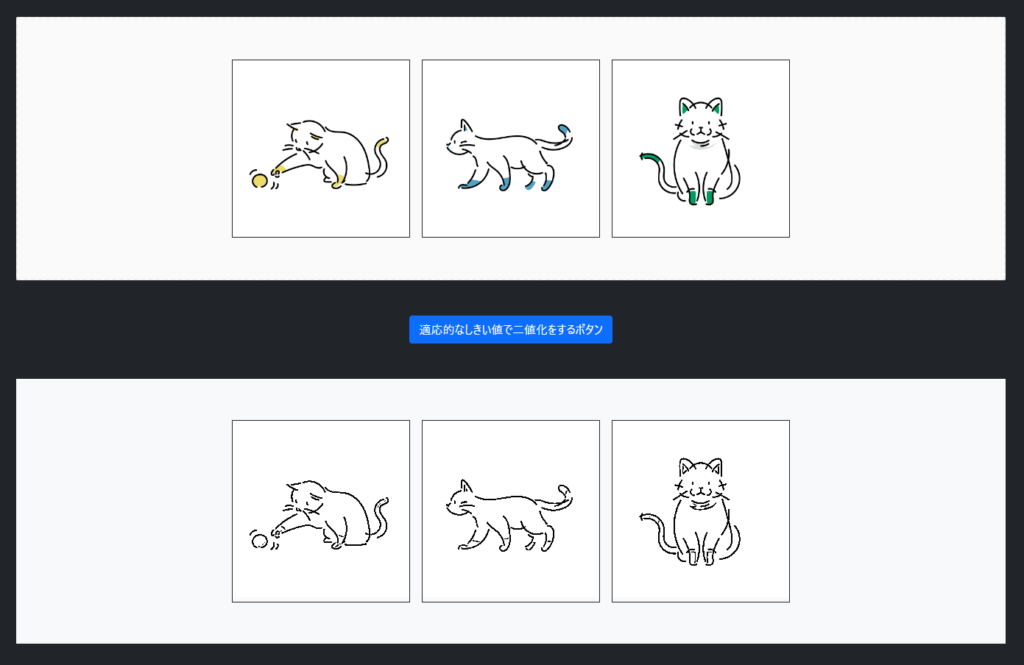
はい、できました。
手先や足先の判断に変化がでました (ΦωΦ)
白黒反転(おまけ)
2値化した結果を白黒反転させておきたいときは、cv.THRESH_BINARY_INV を使います。
書き方は関数で少し変わります。
cv.threshold
cv.threshold(grayMat, thresholdMat, 0, 255, cv.THRESH_OTSU + cv.THRESH_BINARY_INV);cv.adaptiveThreshold
cv.adaptiveThreshold(grayMat, thresholdMat, 255, cv.ADAPTIVE_THRESH_MEAN_C, cv.THRESH_BINARY_INV, 3, 1)ここにコードがないコンポーネントは、過去の記事にあります ('◇’)ゞ
![[React] 画像ファイルをドラッグ&ドロップで取得してみる | 心を無にして始める Reac](https://neko-note.org/wp-content/uploads/react-dropzone-thumbnail-100x100.png)
![[React Bootstrap] Buttons を表示してみる | 心を無にして始める React](https://neko-note.org/wp-content/uploads/react-vol.6-thumbnail-100x100.png)