
FFmpegのffprobeで動画の長さや解像度、コーデックを調べる
FFmpeg に付いている ffprobe を使うと、動画ファイルの長さ・解像度・コーデックを、必要な値だけ取り出せます。アップロードする前に動画の再生時間や画質(解像度)を確かめたいとき、たくさんの動画の情報をスクリプトで一覧にしたいときに使う方法です。
私は検証環境で4本の動画を作り、ffprobe で調べました。値は -show_entries で選び、-of で出力の形を決めます。検証で作った WebM ではストリームごとの長さが N/A になり、回転の情報を持つ縦動画では、width と height が見た目と逆になりました。
検証環境は Ubuntu 24.04.5、FFmpeg 6.1.1(Ubuntu のパッケージ 6.1.1-3ubuntu5)です。動画はすべて FFmpeg のテスト用の映像と音(testsrc2 と sine)から作りました。カメラやスマホで実際に撮った動画、HDR の動画、インターレースの動画、可変フレームレートの動画、URL を指定して調べる使い方は試していません。
ファイル名だけを渡すと、要約が表示される
検証用に、H.264 の映像(1920×1080、30fps、12.5秒)と AAC の音声(13秒)を入れた sample.mp4 を作りました。ファイル名だけを渡すと、次のような要約が表示されます。-hide_banner は、最初に出るバージョンやビルドの設定を表示しないオプションです。
$ ffprobe -hide_banner sample.mp4
Input #0, mov,mp4,m4a,3gp,3g2,mj2, from 'sample.mp4':
  Metadata:
    major_brand     : isom
    minor_version   : 512
    compatible_brands: isomiso2avc1mp41
    encoder         : Lavf60.16.100
  Duration: 00:00:13.00, start: 0.000000, bitrate: 6027 kb/s
  Stream #0:0[0x1](und): Video: h264 (High) (avc1 / 0x31637661), yuv420p(progressive), 1920x1080 [SAR 1:1 DAR 16:9], 6126 kb/s, 30 fps, 30 tbr, 15360 tbn (default)
    Metadata:
      handler_name    : VideoHandler
      vendor_id       : [0][0][0][0]
      encoder         : Lavc60.31.102 libx264
  Stream #0:1[0x2](und): Audio: aac (LC) (mp4a / 0x6134706D), 48000 Hz, stereo, fltp, 127 kb/s (default)
    Metadata:
      handler_name    : SoundHandler
      vendor_id       : [0][0][0][0]
Duration が長さ、Video: の行の h264 がコーデック、1920x1080 が解像度、Audio: の行の aac が音声のコーデックです。目で見て確かめるならこれで足ります。ただ、この要約は標準出力ではなく標準エラーに出るので、そのままではパイプや変数で受け取れません。ここからは、値を選んで取り出す方法です。
長さは format の duration で取り出す
ファイル全体の長さは、format という区分の duration に入っています。-show_entries に「区分=項目」の形で指定すると、その項目だけが表示されます。-v error は、エラー以外のメッセージを表示しない指定です(ffprobe の公式ドキュメント)。
$ ffprobe -v error -show_entries format=duration -of default=noprint_wrappers=1 sample.mp4
duration=13.000000
-of は出力の形の指定です。default の形に noprint_wrappers=1(略して nw=1)を付けると、前後の [FORMAT] と [/FORMAT] の行が出なくなります。さらに nokey=1(nk=1)を付けると、duration= も消えて値だけになります。シェルの変数に入れるときは、この形が便利です。
$ ffprobe -v error -show_entries format=duration -of default=noprint_wrappers=1:nokey=1 sample.mp4
13.000000秒ではなく「時:分:秒」で見たいときは、-sexagesimal を付けます。
$ ffprobe -v error -sexagesimal -show_entries format=duration -of default=noprint_wrappers=1:nokey=1 sample.mp4
0:00:13.000000
映像と音声で長さが違うことがある
sample.mp4 は、映像を12.5秒、音声を13秒にして作りました。ストリーム(ファイルの中の映像と音声それぞれ)の長さは、stream という区分の duration で分かります。
$ ffprobe -v error -show_entries stream=index,codec_type,duration -of compact=p=0 sample.mp4
index=0|codec_type=video|duration=12.500000
index=1|codec_type=audio|duration=13.000000
format の duration は13秒で、長いほうの音声と同じでした。映像が何秒あるかを知りたいときは、stream の値を見ます。
FFmpeg で作った WebM では、ストリームの長さが N/A になった
VP9 の映像と Opus の音声で作った vp9.webm(5秒)では、ストリームの duration が N/A になりました。全体の長さは 5.008 秒と出ています。
$ ffprobe -v error -show_entries format=format_name,duration:stream=index,codec_type,codec_name,codec_tag_string,width,height,duration -of compact=p=0 vp9.webm
index=0|codec_name=vp9|codec_type=video|codec_tag_string=[0][0][0][0]|width=640|height=360|duration=N/A
index=1|codec_name=opus|codec_type=audio|codec_tag_string=[0][0][0][0]|duration=N/A
format_name=matroska,webm|duration=5.008000
このファイルでは、ストリームごとの長さは DURATION というタグ(ファイルに書き込まれた付加情報)に入っていました。タグは stream_tags で指定します。
$ ffprobe -v error -select_streams v:0 -show_entries stream=duration:stream_tags=DURATION -of default=noprint_wrappers=1 vp9.webm
duration=N/A
TAG:DURATION=00:00:05.000000000
解像度とコーデックは stream から取り出す
映像の解像度は stream の width と height、コーデックは codec_name です。-select_streams v:0 で1本目の映像だけに絞ります。v は映像、a は音声、0 は何本目か(0から数える)です。
$ ffprobe -v error -select_streams v:0 -show_entries stream=codec_name,width,height -of csv=p=0 sample.mp4
h264,1920,1080
csv=p=0 は、カンマ区切りで値だけを1行に並べる形です。csv は既定で項目名を出さず、p=0 で行の先頭の stream も消えます。値の順番は、-show_entries に書いた順ではありませんでした。width,height を codec_name の後に書いても前に書いても、出力は h264,1920,1080 の順です。どの値がどれかを確かめたいときは、項目名の付く default の形で一度見てください。
フレームレートやプロファイルなど、ほかの項目も同じ書き方で取り出せます。
$ ffprobe -v error -select_streams v:0 -show_entries stream=codec_name,codec_long_name,profile,pix_fmt,width,height,r_frame_rate,avg_frame_rate,bit_rate -of default=noprint_wrappers=1 sample.mp4
codec_name=h264
codec_long_name=H.264 / AVC / MPEG-4 AVC / MPEG-4 part 10
profile=High
width=1920
height=1080
pix_fmt=yuv420p
r_frame_rate=30/1
avg_frame_rate=30/1
bit_rate=6126034ここでも、出力は書いた順と違い、pix_fmt が height の後に出ています。フレームレートは 30/1 のような分数で表示されます。
音声のコーデックは、-select_streams a:0 にして同じように取り出します。
$ ffprobe -v error -select_streams a:0 -show_entries stream=codec_name,profile,sample_rate,channels,channel_layout,bit_rate -of default=noprint_wrappers=1 sample.mp4
codec_name=aac
profile=LC
sample_rate=48000
channels=2
channel_layout=stereo
bit_rate=127951
H.265(HEVC)の映像を入れた hevc.mp4 では、codec_name は hevc でした。codec_tag_string には、MP4 の中でのコーデックの名前(ここでは作るときに指定した hvc1)が出ます。
$ ffprobe -v error -show_entries format=format_name,duration:stream=index,codec_type,codec_name,codec_tag_string,width,height,duration -of compact=p=0 hevc.mp4
index=0|codec_name=hevc|codec_type=video|codec_tag_string=hvc1|width=1280|height=720|duration=5.000000
index=1|codec_name=aac|codec_type=audio|codec_tag_string=mp4a|duration=5.000000
format_name=mov,mp4,m4a,3gp,3g2,mj2|duration=5.000000
長さ・解像度・コーデックを JSON でまとめて取り出す
-of json にすると、format と stream の値をまとめて JSON で受け取れます。Python や Node.js などのプログラムから読むときは、この形が扱いやすいです。
$ ffprobe -v error -show_entries format=duration,format_name:stream=index,codec_type,codec_name,width,height -of json sample.mp4
{
    "programs": [

    ],
    "streams": [
        {
            "index": 0,
            "codec_name": "h264",
            "codec_type": "video",
            "width": 1920,
            "height": 1080
        },
        {
            "index": 1,
            "codec_name": "aac",
            "codec_type": "audio"
        }
    ],
    "format": {
        "format_name": "mov,mp4,m4a,3gp,3g2,mj2",
        "duration": "13.000000"
    }
}
width と height は数値ですが、duration は "13.000000" という文字列で出ています。計算に使うときは、数値に変換してください。
縦動画は、rotation を見ないと幅と高さが逆になる
動画には、表示するときに映像を何度回すかという情報(回転の情報)を持たせられます(ffmpeg の公式ドキュメントの -display_rotation の説明)。検証では、sample.mp4 を再エンコードせずにコピーし、FFmpeg の -display_rotation 90 で回転の情報だけを付けた rotated.mp4 を作りました。
ffmpeg -display_rotation 90 -i sample.mp4 -c copy rotated.mp4この動画の width と height は、元と同じ 1920 と 1080 のままです。回転の情報は、stream_side_data の rotation で取り出せます。
$ ffprobe -v error -select_streams v:0 -show_entries stream=width,height:stream_side_data=rotation -of default=noprint_wrappers=1 rotated.mp4
width=1920
height=1080
rotation=90
回転の情報がない sample.mp4 で同じコマンドを実行すると、rotation の行は出ず、width と height の2行だけでした。オプションなしの要約では、Side data: の下に displaymatrix: rotation of 90.00 degrees と出ます。
FFmpeg でそれぞれの最初の1コマを PNG に書き出すと、rotated.mp4 から出した画像は 1080×1920 の縦長になりました。同じドキュメントによると、FFmpeg は回転の情報に合わせて映像を自動で回します(-autorotate、既定で有効)。-noautorotate を付けて書き出すと、1920×1080 のままでした。
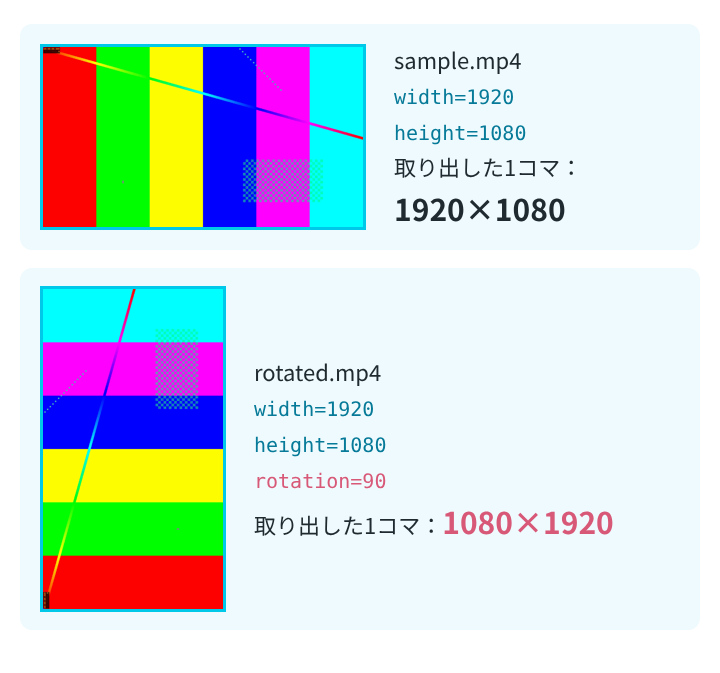
-display_rotation に -90、270、180 を指定した動画も作って調べると、rotation はそれぞれ -90、-90、-180 と表示されました。最初の1コマを書き出すと、-90 の動画は 1080×1920、180 の動画は 1920×1080 です。見た目どおりの縦と横を知りたいときは、rotation が 90 か -90 なら、width と height を入れ替えて考えます。
複数の動画の情報を一覧にするスクリプト
ここまでのコマンドを組み合わせて、渡した動画のファイル名、長さ、映像のコーデック、幅、高さ、回転、音声のコーデックを、タブ区切りで1行ずつ表示する Bash スクリプトにしました。
#!/bin/bash
# 使い方: bash list.sh 動画ファイル...
# ファイル名、長さ(秒)、映像のコーデック、幅、高さ、回転、音声のコーデックを1行ずつ表示する
printf 'file\tduration\tvcodec\twidth\theight\trotation\tacodec\n'
for f in "$@"; do
  d=$(ffprobe -v error -show_entries format=duration -of default=nw=1:nk=1 "$f")
  v=$(ffprobe -v error -select_streams v:0 -show_entries stream=codec_name,width,height -of csv=p=0 "$f")
  r=$(ffprobe -v error -select_streams v:0 -show_entries stream_side_data=rotation -of default=nw=1:nk=1 "$f")
  a=$(ffprobe -v error -select_streams a:0 -show_entries stream=codec_name -of csv=p=0 "$f")
  IFS=, read -r vc w h <<< "$v"
  printf '%s\t%s\t%s\t%s\t%s\t%s\t%s\n' "$f" "$d" "$vc" "$w" "$h" "${r:-0}" "$a"
done
検証用の4本で実行した結果です。
$ bash list.sh hevc.mp4 rotated.mp4 sample.mp4 vp9.webm
file	duration	vcodec	width	height	rotation	acodec
hevc.mp4	5.000000	hevc	1280	720	0	aac
rotated.mp4	13.000000	h264	1920	1080	90	aac
sample.mp4	13.000000	h264	1920	1080	0	aac
vp9.webm	5.008000	vp9	640	360	0	opus
映像がないファイルでは、何も出ずに終わる
-select_streams v:0 で、映像の入っていないファイル(sample.mp4 から音声だけを取り出した audio.m4a)を調べると、何も表示されず、終了コードは 0 でした。エラーにはならないので、スクリプトで使うときは、出力が空かどうかで映像の有無を判断します。
$ ffprobe -v error -select_streams v:0 -show_entries stream=codec_name,width,height -of csv=p=0 audio.m4a; echo "exit=$?"
exit=0
ファイルが存在しないときは、エラーのメッセージが出て、終了コードは 1 でした。
$ ffprobe -v error -show_entries stream=codec_name -of csv=p=0 nothing.mp4; echo "exit=$?"
nothing.mp4: No such file or directory
exit=1